If you have ever wanted to try your hand at soap making, I am here to tell you… DO IT! It is wonderfully fun, perfectly safe (when you use precautions) and absolutely addictive!
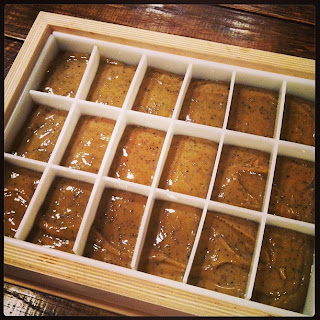
The above picture is my second batch of soap. I have lovingly named it Cafe au Lait, because of the wonderfully light coffee flavor and the specks of coffee within. I plan on using it as a kitchen bar to get rid of onion, garlic, and harsh smells that can get all over you while preparing food.
What finally got me over the hump, was going to a new friends house for a demonstration. She showed us just how easy it is to make a fantastic soap from just a very few ingredients.
I enjoyed it so much, I came home and have made two batches here. It’s great!
Lye is scary when you think about it. You hear all kinds of stories about it blows up if you aren’t careful, and you’ll put your eye out with it…
If you are careful with your measuring, pouring, stirring and just in general, you don’t have to worry about using lye any more than you do with using bleach.
You always want to mix your lye mixture in something that is non-reactive. Something plastic is perfect!
Another little tidbit that I learned is, ALWAYS pour your lye into water.
Here’s a rhyme to help you remember:
Lye into water… it’s always smarter!
Water into lye… you might just die!
I know it’s a little morbid, but believe you me… I did NOT add water into lye! haha
Another thing… when lye and water or whatever liquid you use to make the lye solution, realize that is going to get REALLY, REALLY hot! Stirring it in your sink or on top of a stove is a good idea. You really need to do it somewhere that has plenty of air. I mixed mine in a coffee container like above and put the container in a clean sink. That way if there were any splashes, it would be in the sink. Thankfully there was no problems at all!
Another hint. Let solids melt together over heat.
Mix liquids (besides lye mixture) together and add to melted oils.
Measure carefully. You want exact measurements on your amounts.
When everything is nice and comfortable to the touch (on the outside of the containers) you can mix the lye mixture in to your oil mixture.
As soon as that happens, start whirling with your stick blender.
This may take a little while. You want it going the whole time. Make sure you have set aside a little while, because you can’t leave this part.
When your soap mixture looks like thin pudding and you can lift up your blender there are lines and dollops on top of the soap. That is called trace. Even though it’s a little blurry, you can kinda see the drips setting on top.
You’re ready to put your soap in containers now.
At the demo we were given little samples to take home with us! She used little dixie cups to pour the soap into. As well as a simple discarded box lined with wax paper for her soap mold.
Once it is about 24 hours old, she said you can cut and begin the curing process. Find a nice ventilated area so the soap can dry out. This will take about 4 weeks.
The picture below is my first batch. It has mellowed to the color of the soap above now, but it started out buttery yellow!
Youtube has tons of soap making videos, there are lots of sites to read. This was just a few helpful tips to get you excited and ready to take that next step to making your own soap!


